
DeepSeek Harness (dsh) in Russia: run the DeepSeek AI agent without a VPN or a foreign card
DeepSeek Harness, or dsh, is DeepSeek’s open-source AI agent: it runs in your browser, writes code, executes commands and edits files in the folder you choose. Its built-in DeepSeek connection doesn’t work with RuAPI, but dsh has a “Custom model API” option. Through it, dsh connects to RuAPI in five minutes: one key gives you deepseek-flash, Claude and GPT, you pay in USDT only for the tokens you use, and no VPN is needed.
Updated:
# Node.js 24.9+
$ mkdir dsh-test
$ cd dsh-test
$ npx @deepseek-ai/dsh web
The Terminal tab starts dsh in an empty folder; the Provider tab shows what to enter in “Custom model API”. Replace sk-... with your RuAPI key. Node.js 24.9 or newer is required. In PowerShell, if npx won’t run, type npx.cmd.
What gets in the way of running the DeepSeek agent from Russia
The built-in DeepSeek card doesn’t fit.
The “DeepSeek” card in dsh settings talks only to DeepSeek’s own API and uploads files through /v1/files. It doesn’t work with RuAPI. The working route is “Custom model API” with https://www.ruapi.ai/v1 — that’s how dsh was connected in our test.
You need a way to pay.
An agent uses a lot of tokens: in our test every step sent 26–36 thousand input tokens, because each request carries dsh’s long system prompt. So you need a balance that is easy to top up from Russia. RuAPI takes USDT from 5 USDT; Russians buy USDT for rubles via SBP, no foreign card needed.
Setup is harder than a chat app.
dsh needs Node.js 24.9 or newer (Ubuntu’s default apt installs an older one), starts with npx and opens in the browser at an address with a token. We went through every step ourselves, took screenshots and wrote down the pitfalls — from the token in the URL to the Off reasoning level.
How to connect dsh to RuAPI: 4 steps
Tested on Nov 10, 2026 with DeepSeek Harness 0.2.2-rc.1. The full guide with every screenshot is at docs.ruapi.ai/en/integrations/deepseek-harness.
Sign up at RuAPI and create a key
Sign in at www.ruapi.ai with email, Google, Yandex or Telegram. Console → “API keys” → “Create key”. The agent decides how many requests to make, so it helps to give the key a budget.
New accounts usually get $0.05 right away — enough to try dsh on deepseek-flash, claude-haiku-5-5 or gpt-6-luna before paying. Other models open after your first top-up in USDT from 5 USDT; foreign bank cards are accepted too.
Start dsh in a separate empty folder
- Check node -v: you need 24.9 or newer. If Node.js is missing or old, the guide shows how to install it on Windows, macOS and Linux.
- In an empty folder run npx @deepseek-ai/dsh web. dsh runs the model’s commands and changes files, so don’t start it in a folder with important data.
- Open the full address dsh printed in the terminal, including ?token=… Without the token the page shows “dsh web authentication required”.
- If npx is slow to download the package, the guide has an npm mirror and the command to switch back.
Add RuAPI as a “Custom model API”
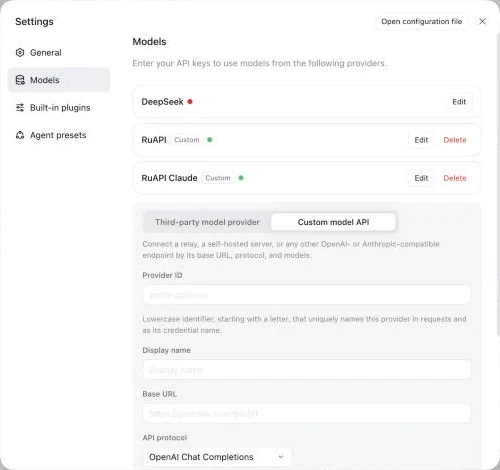
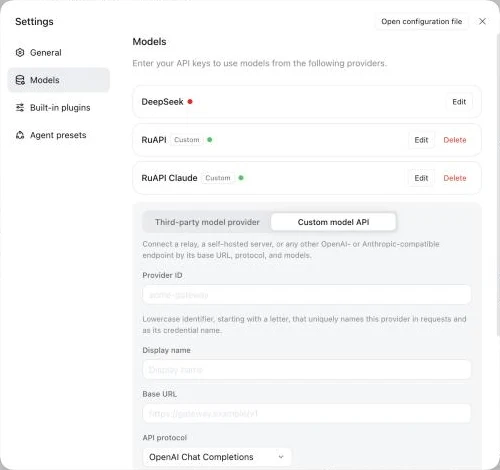
More → Settings → Models → Add model provider → “Custom model API” tab. Provider ID ruapi, Base URL https://www.ruapi.ai/v1, protocol OpenAI Chat Completions, your key. Click “Fetch available models”, tick deepseek-flash, claude-haiku-5-5 and gpt-6-luna, then “Update list” and “Create provider”.
Pick a model and give it a task
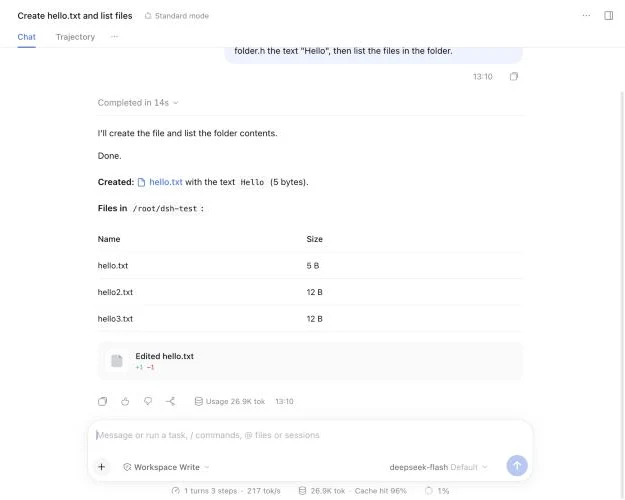
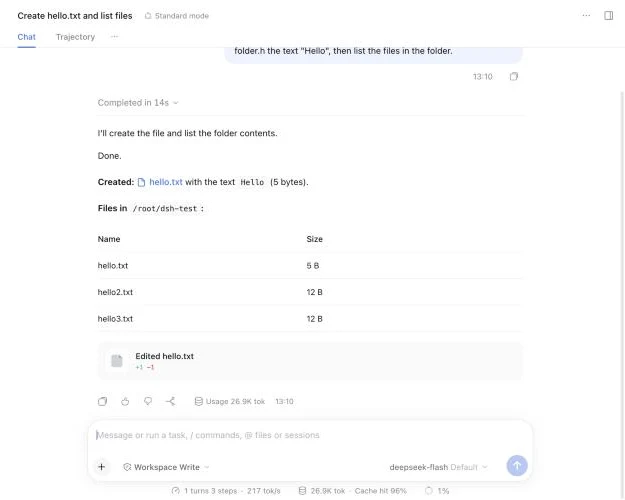
New session → model button at the bottom right → deepseek-flash. In our test the task “create hello.txt and list the files” took deepseek-flash 9 seconds, claude-haiku-5-5 6 and gpt-6-luna 14. Every request and its cost appear in the RuAPI Console → “Usage Logs”.
Full guide: docs.ruapi.ai/en/integrations/deepseek-harness · URLs and keys: docs.ruapi.ai/en/quickstart · buying USDT: docs.ruapi.ai/en/buy-usdt
What to enter in dsh
Custom model API
ID: ruapi
URL: https://www.ruapi.ai/v1
Protocol: OpenAI Chat Completions
Key: sk-... from the Console
Where to start
deepseek-flash — cheap and fast
claude-haiku-5-5
gpt-6-luna
all names on the pricing page
Requirements
Node.js 24.9 or newer
a separate empty folder
browser, URL with ?token=…
Windows, macOS, Linux, server via SSH
What models cost in dsh via RuAPI
Prices per 1M tokens in USD — the same as on the RuAPI pricing page. No subscription: you pay only for what the agent uses.
| model | input $/M | output $/M |
|---|---|---|
| deepseek-flash | $0.17 cache read $0.0120 | $1.44 |
| gpt-6-luna | $0.12 cache read $0.0120 >272K: $0.24 | $0.60 >272K: $0.90 |
| claude-haiku-5-5 | $0.12 cache read $0.0120 >100K: $0.60 | $0.60 >100K: $3.00 |
| glm-5.3 | $1.44 cache read $0.36 | $5.02 |
| kimi-k3.1-pro | $2.40 cache read $0.24 | $12.00 |
| claude-sonnet-5-5 | $2.40 cache read $0.12 | $12.00 |
Most of an agent’s input is the repeated system prompt and history, so it is usually read from cache: in our test 70–97% of input tokens came from cache. Reasoning tokens are billed as output, so for simple tasks it pays to switch deepseek-flash to the Off level — the guide shows how.
The grey “>272K” row is the vendor’s long-prompt rate: if a request is longer than the threshold, all of it is billed at that rate.